How to Combine Multiple Images into PDF
The art of merging multiple images into a single PDF document has evolved into a powerful skill. Whether you’re a professional crafting marketing materials, an educator curating course content, an artist showcasing your portfolio, or simply seeking to organize your visual assets, this transformative capability opens up a world of possibilities.
I remember the first time I was faced with the task of merging a dozen images into a single PDF for a client presentation. The scattered images felt like loose ends waiting to be neatly tied together. Once bundled into a sleek PDF, the images told a compelling story, leading to a successful pitch.
Whether it’s a collection of scanned documents, digital photos, or infographics, merging them into a PDF file not only enhances the visual outlook, but also ensures ease of sharing and preserves the layout and quality of the images.
This article unfolds a step-by-step guide on how you can effortlessly merge multiple images into a single PDF document.
In this guide, you’ll discover how to effortlessly merge multiple images into a single PDF document with easy-to-follow methods.
Here are the methods I recommend.
Table of contents
- The First Step: Prapare Your Images
- Method 1: Using Adobe Acrobat Pro DC
- Method 2: Using Online Converters
- Method 3: Using Preview (for Mac users)
- Method 4: Using Microsoft Word (for Windows users)
- Tips & Best Practices
- Common Issues When Combining Images to PDF”
- Wrapping-Up
The First Step: Preparing Your Images
Preparing your images is the first step when combining multiple images into one PDF.
Let’s see a few tips on how to prepare your images effectively.
Organize and Name Image Files: Before you start, make sure your image files are well-organized in a folder. Give them descriptive names that indicate their content or order if necessary. A logical file naming convention will help you easily identify and arrange the images within the PDF.
Image File Formats: Check the format of your image files. Most image-to-PDF converters support common formats like JPEG, PNG, GIF, and BMP. Ensure that your images are in a compatible format for the tool you plan to use. If needed, convert any incompatible formats to a supported one.
Image Resolution: Consider the resolution of your images. Higher-resolution images provide better quality in the PDF, but they can also result in larger file sizes. Depending on your intended use (e.g., online sharing or printing), adjust the image resolution accordingly. Keep in mind that excessively large images may slow down the PDF creation process.
Image Editing (if necessary): If your images require editing, such as cropping, resizing, or color adjustments, do so before converting them to PDF. You can use image editing software like Adobe Photoshop or free online tools for these tasks. This ensures that your images are in their best possible state before combining them.
Check for Consistency: Ensure that all the images you plan to include in the PDF have a consistent orientation (portrait or landscape) and aspect ratio. This helps maintain a uniform appearance in the final PDF document. If needed, rotate images or crop them to achieve consistency.
Remove Unnecessary Content: If any of your images have unnecessary elements or empty spaces, consider removing them. This can help declutter the final PDF and improve its visual appeal.
By following these steps to prepare your images, you could simplify the process of arranging and customizing them in the final document.
Using Adobe Acrobat
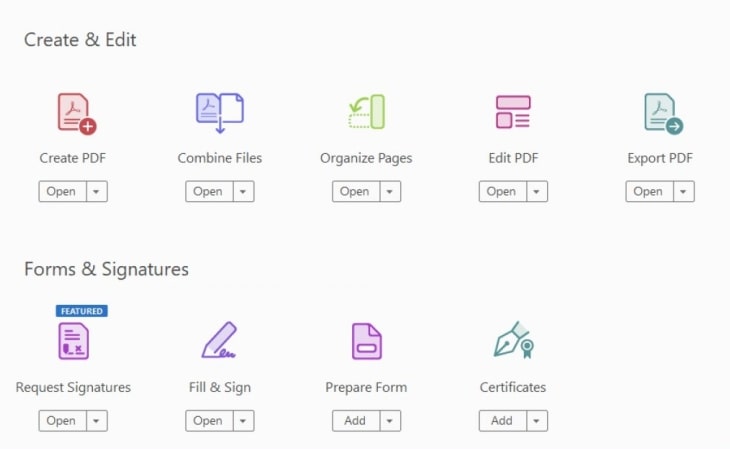
Step 1: Launch Adobe Acrobat and Access the Combine Files Tool
Open Adobe Acrobat on your computer.
Choose “Tools” from the menu at the top.
Select “Combine Files.” This will open the Combine Files interface with a toolbar at the top.
Step 2: Add Your Image Files
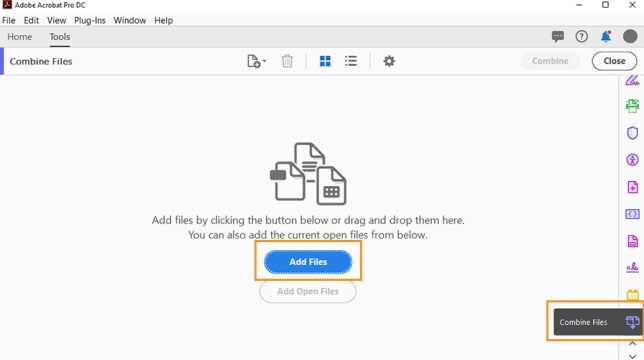
Drag and drop the image files you want to combine into the Combine Files interface. You can also use the “Add Files” menu to select files from various sources such as folders, web pages, open files, scanner pages, clipboard items, or previously combined PDFs.
Step 3: Rearrange and Organize Pages (Optional)
To rearrange the order of pages, use the Thumbnail view in the Combine Files interface. Simply drag and drop the pages or files into the desired position. A blue bar will indicate the current position as you move pages.
You can expand or collapse documents to view or hide individual pages or files within the Thumbnail view. Hover over a page or file and click the “Expand thumbnail” icon to view its contents.
For a closer look at pages, hover over a page and click the “Zoom magnifying glass” icon.
To remove unwanted pages, hover over a page and click the “Delete trash” icon.
Step 4: Customize File Size and Settings (Optional)
Click on “Options” in the Combine Files interface.
Choose one of the available file size options for the converted PDF:
“Smaller File Size”: Suitable for on-screen displays, web, and email, but may reduce image quality.
“Default File Size”: Maintains the original file size and quality, suitable for reliable viewing and printing of business documents.
“Larger File Size”: Designed for high-quality print output, maintains original quality and file size.
In the Options dialog box, specify any additional conversion settings as needed, then click “OK.”
Step 5: Combine Your Files
Once you’ve arranged pages and adjusted settings, click the “Combine” button.
A status dialog box will appear, showing the progress of the file conversion. The source applications may automatically close as the process proceeds.
Step 6: Save Your Combined PDF
After the conversion is complete, you can save your combined PDF file using the “File” menu and choosing “Save As” or “Save.”
That’s it! You’ve successfully used Adobe Acrobat to combine multiple images into a single PDF file, organized and customized according to your preferences.
Using Online Converters
Converting multiple images into a single PDF file can be a straightforward process, and I will guide you how to combine images to PDF online with GorillaPDF tools.
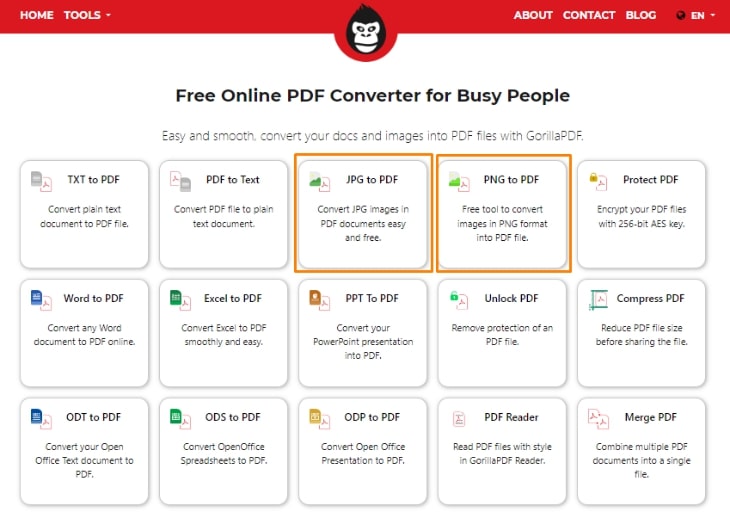
GorillaPDF offers two image to PDF converters:
Here’s how you can achieve this:
Initial Conversion from JPG or PNG to PDF:
Navigate to the GorillaPDF website.
If your images are in JPG format, click on the “JPG To PDF” converter. If they are in PNG format, click on the “PNG To PDF” option.
Click on the “Browse” button to upload your image files from your PC or mobile device.
You can upload up to 10 files with a maximum size of 10MB per file.
After selecting your images, you can rearrange the images by dragging them.
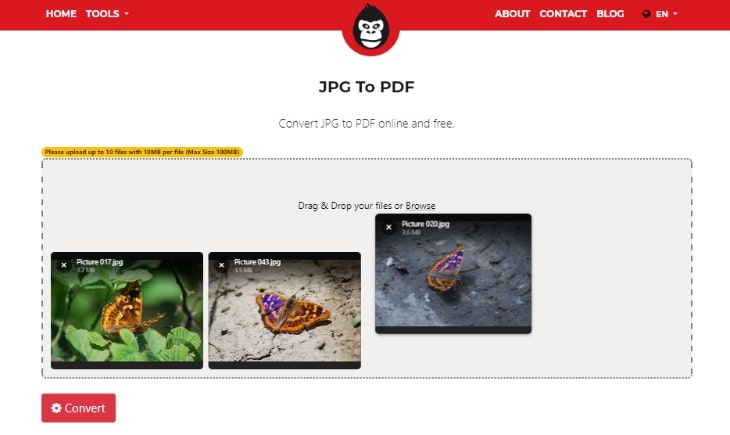
Next, click on the “Convert to PDF” button to initiate the conversion process.
Once the conversion is complete, click on the “Download” button to save the newly created PDF files to your device.
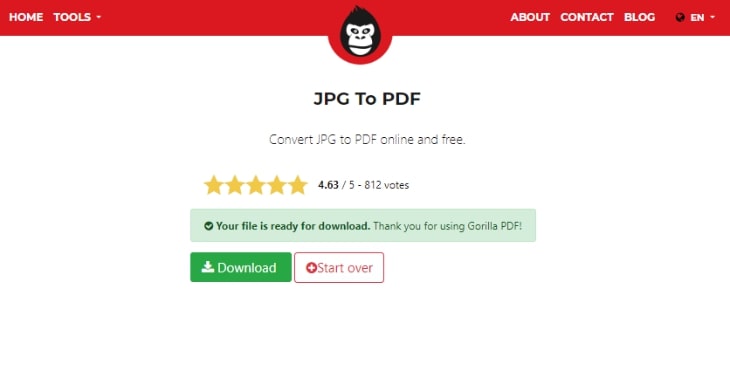
Merging the Converted PDFs into a Single File:
Now that you have individual PDF files, head back to the GorillaPDF homepage and select the “Merge PDF” tool.
Click on the “Browse” button to upload the PDF files you wish to merge.
After uploading, click on the “Merge” button to combine the uploaded PDF files into a single document.
Once the merge process is complete, click on the “Download” button to save the merged PDF file to your device.
With these simple steps, you can quickly convert multiple images into a single, easily shareable PDF document using GorillaPDF.
The platform ensures high-quality conversions, supports large file sizes, and prioritizes user security by deleting uploaded files after 12 hours, making it a reliable choice for your file conversion and merging needs.
Using Preview (for macOS users)
For Mac users, follow these simple steps to make a PDF from multiple images.
Step 1: Open an Image with Preview

Begin by opening one of the multiple images you want to combine into a PDF using the Preview application.
You can usually open Preview by clicking on the image file, and it will automatically open in Preview.
Step 2: Activate Thumbnail View
In the Preview application, go to the “View” menu located in the top menu bar.
Select “Thumbnails” from the dropdown menu. This will display a sidebar with thumbnail previews of your image.
Step 3: Drag and Drop Additional Images
With the thumbnail view activated, you can now drag and drop all the other images you want to include in your PDF into the sidebar.
Arrange them in the desired order by moving them up and down within the sidebar.
Step 4: Select All Images
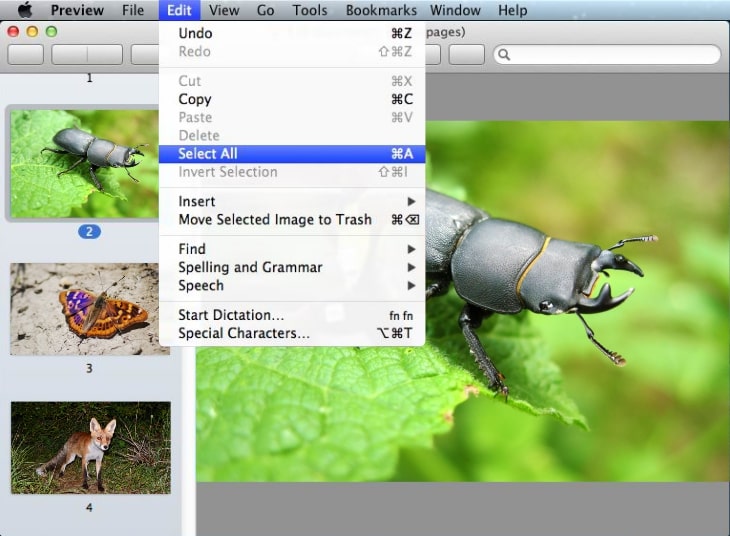
Once all the images are in the sidebar and arranged correctly, go to the “Edit” menu in the top menu bar.
Choose “Select All” from the dropdown menu. Alternatively, you can press and hold the “Shift” key while clicking on each image thumbnail in the sidebar to select them one by one.
Step 5: Save as PDF
With all the images selected, go to the “File” menu in the top menu bar.
Select “Print” from the dropdown menu.
In the Print dialog box, click the “PDF” dropdown menu in the lower-left corner.
Choose “Save as PDF” from the options.
Click the “Save” button to save the selected images as a single PDF file.
Step 6: Open the Destination PDF File
The combined PDF file is now created and saved. You can find it in the location you specified when saving.
To add this PDF to another existing PDF file, open the PDF where you want to add these images using Preview.
Go to “Edit” in the top menu bar.
Select “Insert” and then “Page from File.”
Choose the PDF file you just created with the combined images and click “Open.”
Step 7: Save the Updated PDF (Optional)
If you made changes to an existing PDF, remember to save the updated PDF file.
That’s it! You’ve successfully combined multiple images into a single PDF file using Preview on macOS.
This method allows you to manually arrange images and create a customized PDF with ease.
Using Microsoft Word (for Windows users)
Step 1: Launch Microsoft Word
Start Microsoft Word by clicking “Start” -> “All Programs” -> “Microsoft Office” -> “Microsoft Office Word.” Word will open a new document window.
Step 2: Insert the First Image
In the document window, click on the “Insert” tab in the Word ribbon at the top.
**Select “Picture” or “Image,” then choose “Picture from File” from the dropdown menu.
Browse your computer to locate and select the first image file you want to include. Click “Insert.” The selected image will appear in the Word document.
Step 3: Insert Additional Images
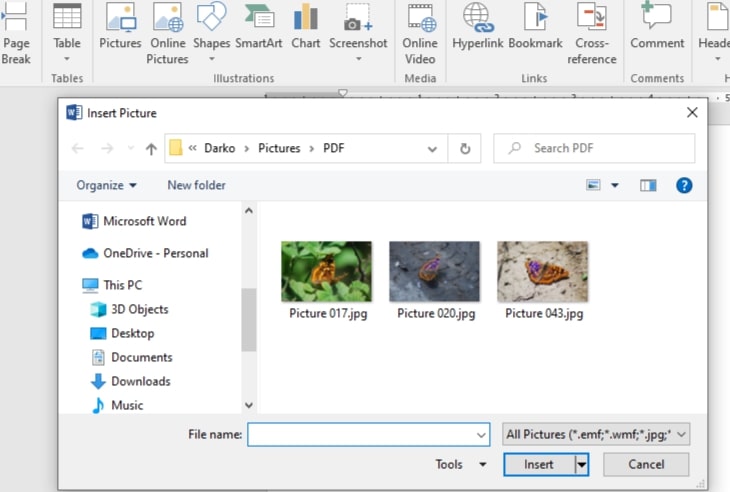
Click anywhere outside the inserted image.
Press the “Enter” key on your keyboard to create a new line.
Repeat Step 2 to insert the remaining images one by one. Each image will appear below the previous one in the Word document.
Step 4: Save as PDF or Word Document
After inserting all the images, click on the “File” tab in the Word ribbon.
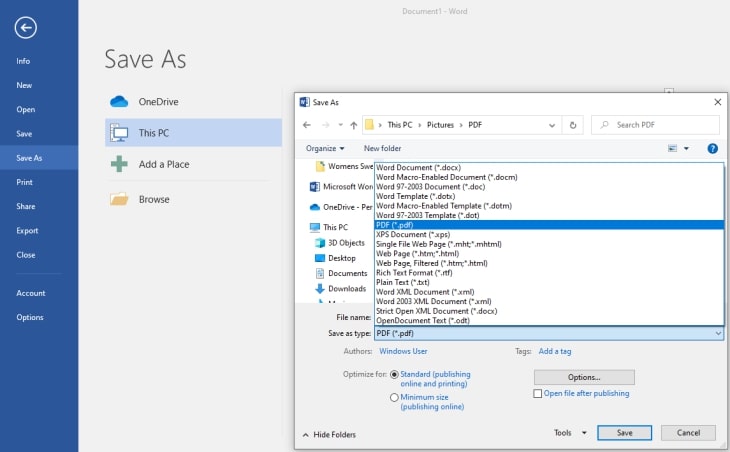
Select “Save As” to save the document.
Choose a location where you want to save the file and provide a suitable file name.
Under the “Save as type” dropdown menu, select either “PDF” (to save the file in PDF format) or “Word Document” (to save the file in Microsoft Word format, such as .doc or .docx).
Click “Save” to generate the file.
That’s it!
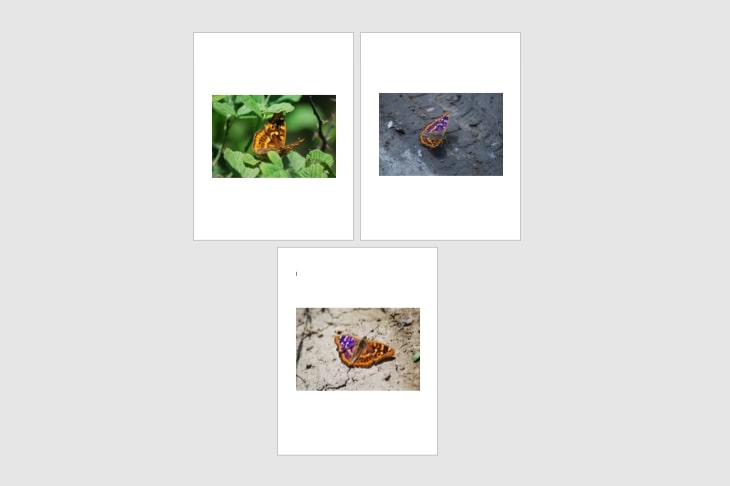
You’ve successfully combined multiple images into a single PDF or Microsoft Word format using Microsoft Office Word.
The resulting file will contain all the inserted images, and you can choose the format that best suits your needs: PDF for a portable and widely compatible document or Word for further editing and customization.
Tips and best practices when combining multiple images into a single PDF file
When you’re putting together a PDF by combining several images, there are some essential things to keep in mind. Think of image quality as the foundation; it’s like starting a painting with the best materials.
For instance, if you’re making a travel brochure with vacation photos, using clear and well-exposed images makes the brochure look great.
Consistency matters too. Make sure all your images have the same orientation, like keeping all your colors consistent in a painting. For example, if you’re creating a product catalog, keep all the product images in either portrait or landscape orientation for a clean look.
Arranging your images is crucial. It’s like arranging pieces in a puzzle. If you’re making an infographic with lots of images, plan the order carefully to tell a clear story.
Adding explanations or text is like giving captions to pictures in a book. If you’re creating a scientific report with images of experiments, add explanations to help people understand.
Watch out for file size, just like managing storage space on your computer. Big PDFs can be hard to share. If you’re making a portfolio of your photos, resize the PDF to make it easier to email.
Lastly, proofreading is like double-checking your work. If you’re making a wedding album for a client, review it carefully to catch any mistakes or inconsistencies.
By considering these points in your image-to-PDF project, as shown in the examples, you’ll create a better final document, whether it’s a brochure, catalog, infographic, scientific report, portfolio, or wedding album.
Common Issues When Converting Multiple Images to PDF
When combining multiple images into a single PDF document, you may encounter common issues that can affect the quality and appearance of the final output.
One prevalent problem is image resolution discrepancies
If some images have significantly lower resolutions than others, it can result in a PDF with varying levels of image quality.
To address this, ensure that all images have a consistent resolution or consider resizing them to match.
Another issue arises from image orientation disparities. Mixing portrait and landscape-oriented images within the same PDF can disrupt the document’s visual flow. To resolve this, adjust the orientation of images as needed before combining them.
Inconsistent aspect ratios can have a similar impact, causing images to appear stretched or distorted in the PDF. Maintaining uniform aspect ratios is essential to preserve the integrity of each image.
Sometimes, during the merging process, images may not align correctly, leading to overlapping or misplaced elements. To rectify this, review the placement and arrangement of images within your PDF software and make necessary adjustments.
File size can be a concern, particularly with larger images. A PDF that contains high-resolution images may become unwieldy, making it challenging to share or load efficiently. Compressing the PDF or resizing the images can help alleviate this issue.
If you find that the combined PDF does not look as expected, consider the settings and options within your PDF creation software. Ensure that compression settings, image quality, and page dimensions are configured appropriately for your intended use.
In troubleshooting these common issues, careful attention to image consistency, resolution, orientation, aspect ratio, and file size can help you create a polished and visually pleasing PDF document that effectively conveys your message or information.
Wrapping-Up
In conclusion, combining multiple images into a single PDF document is a versatile and valuable process, with various methods at your disposal. We’ve explored methods ranging from Adobe Acrobat for comprehensive control to Microsoft Word and Preview for simplicity and accessibility. Each method offers unique advantages, making it crucial to select the one that aligns best with your specific requirements.
The importance of choosing the right method cannot be overstated. Whether you’re creating a professional presentation, a visual portfolio, or a meticulously organized catalog, the choice of tools and techniques can significantly impact the quality and efficiency of your final PDF. Consider factors such as image quality, ease of use, customization options, and the intended use of the document to make an informed decision.
Ultimately, the aim is to encourage the creation of well-organized PDF documents from images. Whether you’re an artist showcasing your work, a business professional crafting a report, or an educator designing educational materials, the process of combining images into PDFs allows you to convey your message effectively and professionally. By following the methods and best practices discussed, you can transform your images into compelling and visually engaging documents that leave a lasting impression on your audience.
So, embrace the power of combining images into PDFs and unlock new possibilities for communication and expression.
